ServiceNow Integration
- How the ServiceNow integration works
- How to configure your ServiceNow instance for Obkio
- How to configure the integration in Obkio
- How to troubleshoot the integration
What you are going to learn:
Note: The ServiceNow integration is only available in the Premium Subscription Plan.
The ServiceNow integration sends Obkio notifications to your ServiceNow instance. When Obkio detects a Network Issue, an incident is opened in ServiceNow. When the issue recovers, the same incident is resolved. There is no need to create tickets manually or to copy the monitoring data from Obkio.
How It Works 
- Obkio sends each event to an Import Set table in your ServiceNow instance using the ServiceNow Import Set API. A Transform Map then creates or updates the incident.
- One Obkio issue = one ServiceNow incident. Each issue has a unique correlation ID. When the issue gets worse or better, the same incident is updated instead of creating a duplicate. If the issue comes back after it was closed in Obkio, a new incident is opened.
- When the issue recovers, Obkio sends a
resolveevent and the incident is resolved. The resolve event keeps the highest severity reached during the issue. - The integration is configured for the whole organization and uses the same rules as the other notification types: only the issues that reach your organization's Minimum Notification Severity are sent to ServiceNow. Notification delays and muted notifications also apply.
- Issues from Monitoring Sessions, Network Devices, Device Interfaces, APM Tests (including Microsoft Teams tests) and Obkio Vision are sent.
- The integration is one-way: acknowledging or closing an incident in ServiceNow has no effect in Obkio.
Obkio severity levels are sent in the u_severity field: info, warning, error or critical.
Requirements
- ServiceNow: Washington D.C. release or later. The API Key authentication used by Obkio (the
x-sn-apikeyHTTP header) is not available in earlier releases. To check your release, go to System Diagnostics -> Stats and look at theBuild name. - ServiceNow: An administrator who can create tables, transform maps and API access policies. The
adminrole is required to run the optional scripts below. - Obkio: The Premium Subscription Plan.
- Obkio: The Administrator role in your Obkio organization.
Part 1: ServiceNow Configuration
Step 1: Create the Import Set Table
The Import Set table is the staging table where Obkio sends the alert data.
- Go to System Definition -> Tables and click
New. - Set the Label to
Obkio Alert. The Name is generated automatically (for exampleu_obkio_alert). Note this name: it is theTable Nameyou will enter in Obkio. - In Extends table, select
Import Set Row(sys_import_set_row). - Leave Auto-number unchecked and click
Submit.
Step 2: Add the Columns
Obkio sends flat fields (not nested JSON), all as strings. Add a String column for each field below. ServiceNow ignores the fields that don't have a column, so you can start with the core fields and add the optional fields later.
Core fields
| Column Name | Max Length | Description |
|---|---|---|
u_v | 10 | Event schema version (always 1) |
u_sn_event_action | 20 | open, or resolve when the issue recovers |
u_correlation_id | 100 | Unique identifier of the Obkio issue |
u_correlation_display | 50 | Always Obkio |
u_title | 255 | Issue title, for example High packet loss |
u_summary | 500 | Issue details (agents or device, and the issue) |
u_severity | 20 | info, warning, error or critical |
u_service | 100 | Type of monitored object (see the optional fields) |
u_service_key | 100 | Identifier of the monitored object |
u_service_ci_sys_id | 32 | Reserved for CMDB linking (always empty) |
u_source | 255 | Event source, for example obkio:device:123 |
u_observed_at | 50 | Event date and time (ISO 8601, UTC) |
Optional fields, which give more context on the issue:
| Column Name | Max Length | Description |
|---|---|---|
| Event | ||
u_event_type | 50 | Issue type, for example latency |
u_event_number | 20 | Event sequence number |
Monitoring Sessionsu_service: network_monitoring_session | ||
u_session_key | 100 | Identifier of the Monitoring Session |
u_generator | 255 | Name of the generator agent |
u_generator_id | 50 | ID of the generator agent |
u_reflector | 255 | Name of the reflector agent |
u_reflector_id | 50 | ID of the reflector agent |
u_monitoring_name | 255 | Name of the Monitoring Template |
u_monitoring_id | 50 | ID of the Monitoring Template |
Network Devicesu_service: device | ||
u_device_id | 50 | ID of the Network Device |
u_device_name | 255 | Name of the Network Device |
u_collector_agent | 255 | Name of the collector agent |
Device Interfacesu_service: device_interface | ||
u_interface_id | 100 | ID of the interface |
u_interface_name | 255 | Name of the interface |
u_interface_index | 20 | SNMP index of the interface |
APM Testsu_service: apm, apm_test_teams (Microsoft Teams) | ||
u_apm_id | 100 | ID of the APM Test |
u_apm_name | 255 | Name of the APM Test |
u_apm_type | 50 | Type of APM Test |
u_apm_agent | 255 | Name of the agent running the test |
u_apm_teams_id | 100 | ID of the Microsoft Teams test |
Obkio Visionu_service: vision | ||
u_destination_test_id | 50 | ID of the destination test |
u_destination_test_name | 255 | Name of the destination test |
u_agent_id | 50 | ID of the agent running the test |
u_agent_name | 255 | Name of the agent running the test |
| Metrics (latency, jitter and packet loss issues only) | ||
u_latency_ms | 20 | Latency in milliseconds |
u_jitter_ms | 20 | Jitter in milliseconds |
u_loss_pct | 20 | Packet loss in percent |
To create all the columns at once, you can run this script in System Definition -> Scripts - Background (change tableName if your table has another name):
var tableName = 'u_obkio_alert';

var columns = [
    {name: 'u_v', length: 10},
    {name: 'u_sn_event_action', length: 20},
    {name: 'u_correlation_id', length: 100},
    {name: 'u_correlation_display', length: 50},
    {name: 'u_title', length: 255},
    {name: 'u_summary', length: 500},
    {name: 'u_severity', length: 20},
    {name: 'u_service', length: 100},
    {name: 'u_service_key', length: 100},
    {name: 'u_service_ci_sys_id', length: 32},
    {name: 'u_source', length: 255},
    {name: 'u_observed_at', length: 50},
    {name: 'u_event_type', length: 50},
    {name: 'u_event_number', length: 20},
    {name: 'u_session_key', length: 100},
    {name: 'u_generator', length: 255},
    {name: 'u_generator_id', length: 50},
    {name: 'u_reflector', length: 255},
    {name: 'u_reflector_id', length: 50},
    {name: 'u_monitoring_name', length: 255},
    {name: 'u_monitoring_id', length: 50},
    {name: 'u_device_id', length: 50},
    {name: 'u_device_name', length: 255},
    {name: 'u_collector_agent', length: 255},
    {name: 'u_interface_id', length: 100},
    {name: 'u_interface_name', length: 255},
    {name: 'u_interface_index', length: 20},
    {name: 'u_apm_id', length: 100},
    {name: 'u_apm_name', length: 255},
    {name: 'u_apm_type', length: 50},
    {name: 'u_apm_agent', length: 255},
    {name: 'u_apm_teams_id', length: 100},
    {name: 'u_destination_test_id', length: 50},
    {name: 'u_destination_test_name', length: 255},
    {name: 'u_agent_id', length: 50},
    {name: 'u_agent_name', length: 255},
    {name: 'u_latency_ms', length: 20},
    {name: 'u_jitter_ms', length: 20},
    {name: 'u_loss_pct', length: 20}
];

columns.forEach(function(col) {
    var gr = new GlideRecord('sys_dictionary');
    gr.addQuery('name', tableName);
    gr.addQuery('element', col.name);
    gr.query();
    if (!gr.hasNext()) {
        gr.initialize();
        gr.name = tableName;
        gr.element = col.name;
        gr.column_label = col.name.replace('u_', '').replace(/_/g, ' ');
        gr.internal_type = 'string';
        gr.max_length = col.length;
        gr.insert();
        gs.info('Created column: ' + col.name);
    } else {
        gs.info('Column already exists: ' + col.name);
    }
});
Step 3: Create the Transform Map
The Transform Map converts the Obkio records into incidents.
- Go to System Import Sets -> Administration -> Transform Maps and click
New. - Set the Name to
Obkio Alert to Incident. - Set the Source table to your Import Set table (for example
u_obkio_alert) and the Target table toIncident(incident). - Click
Submit.
Note: The field mapping dropdowns only list the columns that contain data. If the source fields are missing, insert a sample record in the Import Set table first, for example with this script in Scripts - Background (change u_obkio_alert if your table has another name), then refresh the Transform Map:
var gr = new GlideRecord('u_obkio_alert');
gr.initialize();
gr.u_v = '1';
gr.u_sn_event_action = 'open';
gr.u_correlation_id = 'setup:test:001';
gr.u_correlation_display = 'Obkio';
gr.u_title = 'Test alert for field mapping setup';
gr.u_summary = 'This record enables field mapping in Transform Map';
gr.u_severity = 'info';
gr.u_service = 'network_monitoring_session';
gr.u_service_key = 'test-123';
gr.u_source = 'obkio:setup:test';
gr.u_observed_at = '2025-01-01T00:00:00.123Z';
gs.info('Created sample record: ' + gr.insert());
You can delete this record (u_correlation_id = setup:test:001) once the field maps are created.
Step 4: Add the Field Maps
In the Transform Map, add these field maps (manually or with Mapping Assist):
| Source Field | Target Field | Field Map Settings |
|---|---|---|
u_correlation_id | correlation_id | Coalesce checked |
u_correlation_display | correlation_display | |
u_title | short_description | |
u_summary | description | |
u_observed_at | opened_at | Date formatyyyy-MM-dd'T'HH:mm:ss.SSS'Z' |
- Coalesce must be checked on
u_correlation_id. This is what updates the same incident for the whole issue instead of creating a new incident for each event. - The Date format matches the date sent by Obkio, in UTC with the ISO 8601 format and always three digits after the second (for example
2026-08-18T14:20:23.457Z). Without this date format,opened_atstays empty. Use threeS, not six: in ServiceNow aSis a millisecond, not a digit, so.SSSSSSreads the fraction as a number of milliseconds and setsopened_atseveral minutes after the event.
Step 5: Add the Transform Script
The transform script sets the incident urgency from the Obkio severity, resolves the incident when the issue recovers and adds the issue details in the work notes. In the Transform Map, open the Transform Scripts related list, click New, set When to onBefore and paste this script:
(function runTransformScript(source, map, log, target) {

    // Obkio severity -> ServiceNow urgency
    var severity = source.u_severity.toString().toLowerCase();
    if (severity === 'critical') {
        target.urgency = '1'; // High
    } else if (severity === 'error') {
        target.urgency = '2'; // Medium
    } else {
        target.urgency = '3'; // Low (warning, info)
    }

    // Incident state
    var snEventAction = source.u_sn_event_action.toString().toLowerCase();
    if (snEventAction === 'resolve') {
        target.state = '6'; // Resolved
        target.close_code = 'Solved (Permanently)';
        target.close_notes = 'Network issue resolved - monitored by Obkio';
    } else if (snEventAction === 'open') {
        // Only on creation, so an incident In Progress is not reset to New
        if (target.operation() == 'insert') {
            target.state = '1'; // New
        }
    }

    // Work notes
    var workNote = 'Obkio Network Monitoring Update\n';
    workNote += 'Service: ' + source.u_service + '\n';
    workNote += 'Event Type: ' + (source.u_event_type || 'N/A') + '\n';
    workNote += 'Severity: ' + source.u_severity + '\n';
    workNote += 'Observed At: ' + source.u_observed_at + '\n';
    if (source.u_generator) workNote += 'Generator: ' + source.u_generator + '\n';
    if (source.u_reflector) workNote += 'Reflector: ' + source.u_reflector + '\n';
    if (source.u_monitoring_name) workNote += 'Monitoring: ' + source.u_monitoring_name + '\n';
    if (source.u_device_name) workNote += 'Device: ' + source.u_device_name + '\n';
    if (source.u_interface_name) workNote += 'Interface: ' + source.u_interface_name + '\n';
    if (source.u_collector_agent) workNote += 'Collector: ' + source.u_collector_agent + '\n';
    if (source.u_apm_name) workNote += 'APM Test: ' + source.u_apm_name + '\n';
    if (source.u_apm_agent) workNote += 'Agent: ' + source.u_apm_agent + '\n';
    if (source.u_destination_test_name) workNote += 'Destination: ' + source.u_destination_test_name + '\n';
    if (source.u_agent_name) workNote += 'Agent: ' + source.u_agent_name + '\n';
    if (source.u_latency_ms) workNote += 'Latency: ' + source.u_latency_ms + ' ms\n';
    if (source.u_jitter_ms) workNote += 'Jitter: ' + source.u_jitter_ms + ' ms\n';
    if (source.u_loss_pct) workNote += 'Packet Loss: ' + source.u_loss_pct + '%\n';
    target.work_notes = workNote;

})(source, map, log, target);
Note: The close_code choices are different between ServiceNow releases. If Solved (Permanently) is not a valid choice on your instance, the incident is not resolved. Use a value from your incident form.
Step 6: Create the API Key
Obkio authenticates to ServiceNow with an API Key sent in the x-sn-apikey HTTP header.
- Inbound Authentication Profile: Go to System Web Services -> API Access Policies -> Inbound Authentication Profile and click
New. Set the Name toObkio API Key, the Authentication method toAPI Key, the API key location toHTTP Headerand the HTTP header name tox-sn-apikey. Check Active and clickSubmit. - REST API Key: Go to System Web Services -> API Access Policies -> REST API Keys and click
New. Set the API key name toObkio Integrationand select the integration User. This user needs theimport_set_loaderrole. Check Active and clickSubmit. Copy the generated key: it is theNew API Keyyou will enter in Obkio. - REST API Access Policy: Go to System Web Services -> API Access Policies -> REST API Access Policies and click
New. Set the Name toObkio Import Set Accessand the REST API toImport Set API, and check Active. In the Authentication Profiles section, add theObkio API Keyprofile, then clickSubmit.
Note: The API Key must be authorized on the Import Set API. Obkio sends the alerts to /api/now/import/<Table Name> on your instance.
Part 2: Obkio Configuration
- In the Obkio App, go to the Organization Advanced Parameters (Menu -> Organization Name -> Change Organization's Advanced Parameters). In the
Generaltab, scroll down to theServiceNow Keysection. - Check
Enable ServiceNow integration. - Fill in the three fields:
- URL: The base URL of your ServiceNow instance only, for example
https://your-instance.service-now.com. It must start withhttps://. Don't add/api/now/...: Obkio adds/api/now/import/<Table Name>itself. - Table Name: The Name of the Import Set table from Step 1 (for example
u_obkio_alert), not its Label. - New API Key: The REST API Key from Step 6.
- URL: The base URL of your ServiceNow instance only, for example
- The settings are saved automatically once all three fields are filled. Until then, the note
All ServiceNow fields are required — changes are saved once the section is complete.is shown. - Click
Send Test To ServiceNow. The messageA test has been sent to ServiceNowconfirms that the test record was accepted by ServiceNow. In ServiceNow, a record with the titleTest record from Obkiois added to the Import Set table. If the Transform Map is active, an incident is also created: you can close it.
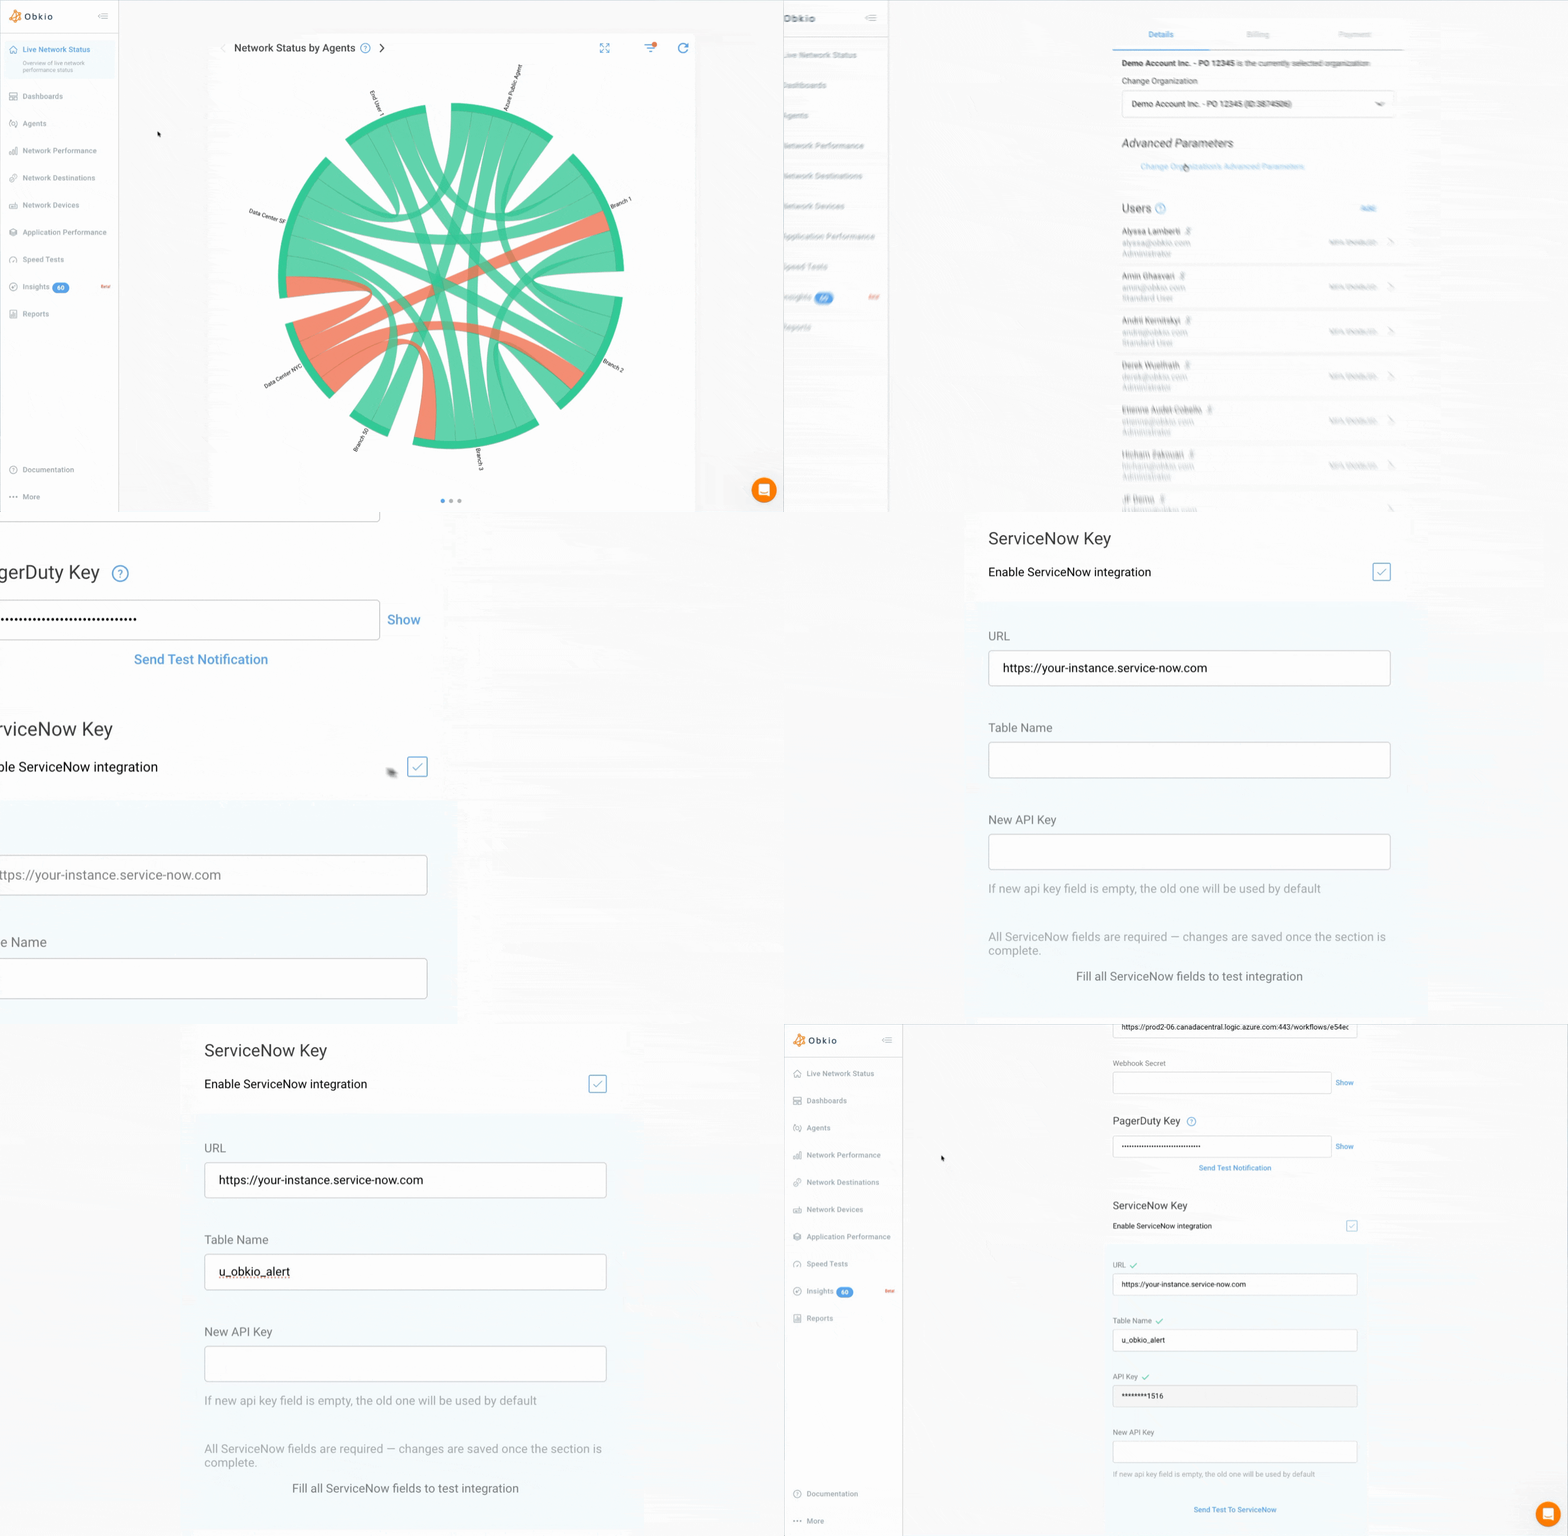
Once saved, the API Key is not displayed again: the read-only API Key field only shows its last 4 characters. To replace the key, enter the new key in the New API Key field. If this field is empty, the current key is kept.
Disable the Integration
To disable the integration, uncheck Enable ServiceNow integration and confirm with Remove. The ServiceNow configuration and the stored API Key are deleted. To enable the integration again, you will need to enter the three fields again.
Troubleshooting
Authentication Failed (401)
The test shows Authentication failed. Please check your API key., or ServiceNow answers User is not authenticated.
- Check that the URL contains only the instance address (
https://your-instance.service-now.com), without any/api/now/...path. With an extra path, the request doesn't reach the Import Set API and the API Key is refused. - Check that the REST API Access Policy is active, uses the Import Set API and includes the
Obkio API Keyauthentication profile. - Check that the REST API Key is active. Compare the last 4 characters shown in the
API Keyfield in Obkio with your key. If they don't match, enter the key again inNew API Key.
Access Denied (403) or Table Not Found (404)
Access denied. The API key may not have write permissions for this table.: Check that the integration user has theimport_set_loaderrole.Import Set table '<Table Name>' not found. Please verify the table name.: Check theTable Namein Obkio. It is the table Name (for exampleu_obkio_alert), not its Label, and it is case-sensitive.
The Incident Date (opened_at) Is Empty or Wrong
Check the Date format of the u_observed_at -> opened_at field map in the Transform Map. It must be yyyy-MM-dd'T'HH:mm:ss.SSS'Z'. An empty opened_at usually means no date format is set, and an opened_at a few minutes after the event usually means the date format uses six S instead of three. See Step 4.
A New Incident Is Created for Each Event
Check that Coalesce is checked on the u_correlation_id -> correlation_id field map.
Incidents Are Not Resolved
Check that the transform script from Step 5 is active and that the close_code value is valid on your instance.
Nothing Is Received in ServiceNow
- Only the issues that reach your organization's Minimum Notification Severity are sent to ServiceNow. For example, with the default value
Error,Warningissues are not sent. - Use
Send Test To ServiceNowto validate the URL, the table and the API Key. - Learn more on Notifications Troubleshooting.